< PREVIOUS: Coding the INDEX
|
CODING: THE GALLERY |
 BE CAREFUL!! MAKE SURE YOUR SAVED YOUR PREVIOUS PAGE BEFORE MOVING ON TO A NEW ONE!! BE CAREFUL!! MAKE SURE YOUR SAVED YOUR PREVIOUS PAGE BEFORE MOVING ON TO A NEW ONE!!
Now that you coded (or started figuring out how to code) your first page, go back to your dashboard. Hover and click on the “EDIT” link of your gallery.html page; this will lead you to the raw code page of gallery.html.
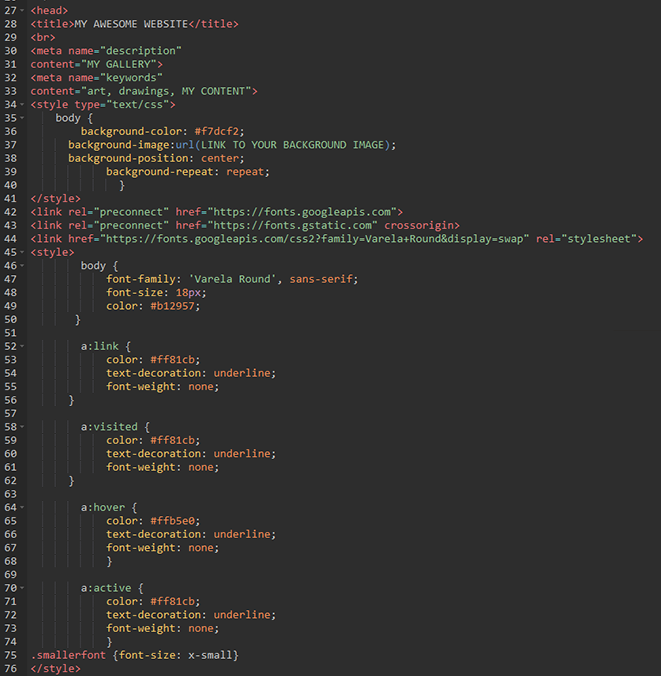
 You might notice a lot of things are similar to your previous page, (the index.html page): You might notice a lot of things are similar to your previous page, (the index.html page):
If you want your website to look the same on each page (regarding link colors, font colors, background, etc) just copy the section shown in the image above from your index page and paste it into the same section on this page to replace it. Don't forget to also change the table, banner and navigation bar sections if you want to (see the index tutorial right after "now let's get back to the code"). If you want a different look for each page, you'll have to change it... on every page! Don't worry, it all works the same: you'll have to mainly change hex color codes, or urls!
Before copy-pasting anything, make sure the code works!
Be mindful of this part of the code: "navigation > HOME | <a href="https://YOURWEBSITEHERE.neocities.org/gallery.html">GALLERY</a> | <a href="https://YOURWEBSITEHERE.neocities.org/about.html">ABOUT</a>" on this page, the gallery page, it's SLIGHTLY different, there's no link linking to the gallery (you're already here!) but a link going to your homepage: "navigation > <a href="https://YOURWEBSITEHERE.neocities.org/index.html">HOME</a> | GALLERY | <a href="https://YOURWEBSITEHERE.neocities.org/about.html">ABOUT</a>"
This is just a little tip to help make your navigation a bit clearer! Just change the color as explained in the index tutorial if you want to.
|
|
<tr>
<td><div align="center">My drawings<br>
(this is the same picture 4 times, just showing you how the gallery works. <br>
Click the preview to see the full images and alt text!)<br>
<a href="LINK TO YOUR FIRST DRAWING" data-lightbox="drawings" data-title="describe your image"><img src="LINK TO THE PREVIEW OF YOUR FIRST DRAWING" width="100" height="100" border="3"/></a> <a href="LINK TO ANOTHER DRAWING" data-lightbox="drawings" data-title="describe your image"><img src="LINK TO THE PREVIEW OF ANOTHER DRAWING" width="100" height="100" border="3"/></a> <a href="LINK TO ANOTHER DRAWING" data-lightbox="drawings" data-title="describe your image"><img src="LINK TO THE PREVIEW OF ANOTHER DRAWING" width="100" height="100" border="3"/></a> <a href="LINK TO ANOTHER DRAWING" data-lightbox="drawings" data-title="describe your image"><img src="LINK TO THE PREVIEW OF ANOTHER DRAWING" width="100" height="100" border="3"/></a> data-lightbox="drawings" data-title="describe your image"><img src="LINK TO THE PREVIEW OF YOUR FIRST DRAWING" width="100" height="100" border="3"/></a> <a href="LINK TO ANOTHER DRAWING" data-lightbox="drawings" data-title="describe your image"><img src="LINK TO THE PREVIEW OF ANOTHER DRAWING" width="100" height="100" border="3"/></a> <a href="LINK TO ANOTHER DRAWING" data-lightbox="drawings" data-title="describe your image"><img src="LINK TO THE PREVIEW OF ANOTHER DRAWING" width="100" height="100" border="3"/></a> <a href="LINK TO ANOTHER DRAWING" data-lightbox="drawings" data-title="describe your image"><img src="LINK TO THE PREVIEW OF ANOTHER DRAWING" width="100" height="100" border="3"/></a>
|
 The fun part starts now! The code you see here is how the previews/thumbnails AND the links to your drawings work. The fun part starts now! The code you see here is how the previews/thumbnails AND the links to your drawings work.
The quick description on the top <td><div align="center">My drawings<br>
(this is the same picture 4 times, just showing you how the gallery works. <br>
Click the preview to see the full images and alt text!) is optional!
Now it's very easy. "LINK TO YOUR FIRST DRAWING" is the direct url of your full-sized image. I advise creating a separate folder for your full res images (create a new folder in your dashboard, and upload your drawings there, especially if you have a lot. Be careful, your link will be different if you move things into a new folder, like
https://YOURWEBSITE.neocities.com/gallery/art.png
Also create a separate folder for your previews/thumbnails to make sure you don't get confused.
Insert the thumbnail link instead of "LINK TO THE PREVIEW OF YOUR FIRST DRAWING"
data-lightbox="drawings" is very important because it will separate the different types of galleries on your page (I'll get to it later). For example, if you call this part DRAWINGS, the "next drawing" button will only move on to items from the category "DRAWINGS". If not, it'll just move on to the next one on the page. it's useful if you want a separate"nsfw" section and don't want people to next on it by accident.
data-title="describe your image" can be used as an ALT text, but you can also put infos such as what were your thoughts, the character names, who made this fanart, etc.
width="100" height="100" is the size of your preview images.
border="3" is because I like having a border on clickable images. You can set it to 0 if you don't want one.
You can add as many <a href="LINK TO ANOTHER DRAWING" data-lightbox="drawings" data-title="describe your image"><img src="LINK TO THE PREVIEW OF ANOTHER DRAWING" width="100" height="100" border="3"/></a>
as you want, as long as you respect the format. Each image and its preview will start with <a href=" and ends with </a>. This is where renaming your files properly comes in handy, if you can tell what it is from the title, you're less likely to get lost in a long list of images! Ctrl + F is your friend!
|
|
I think it's easier to separate your drawings from the rest of the site images (by creating a folder in your dashboard page, just name it "art" or "drawings") just be extra mindful that your links are correct. It should look like this: https://YOURWEBSITE.neocities.org/gallery/yourdrawing.png
As for the preview image, I like to keep the names simple and logical by adding prev_ (prev for preview) at the beginning. Files are easier to find. For exemple, imagine a drawing named rat.png, the preview will be prev_rat.png ...Avoid lazy names like UIFQDYSIUBN.png or shitposty names like whateveridk.png or you'll regret it later and risk mixing up files.
There are many ways to make your files easier to navigate and read. Don't hesitate to create folders, and make your own renaming technique!
Now back to coding...
|
Fanarts<br>
(this is the same picture 4 times, just showing you how the gallery works. <br>
Click the preview to see the full images and alt text!)<br>
<a href="LINK TO YOUR FIRST DRAWING" data-lightbox="another category" data-title="describe your image"><img src="LINK TO THE PREVIEW OF YOUR FIRST DRAWING" width="100" height="100" border="3"/></a> <a href="LINK TO ANOTHER DRAWING" data-lightbox="another category" data-title="describe your image"><img src="LINK TO THE PREVIEW OF ANOTHER DRAWING" width="100" height="100" border="3"/></a> <a href="LINK TO ANOTHER DRAWING" data-lightbox="another category" data-title="describe your image"><img src="LINK TO THE PREVIEW OF ANOTHER DRAWING" width="100" height="100" border="3"/></a> <a href="LINK TO ANOTHER DRAWING" data-lightbox="another category" data-title="describe your image"><img src="LINK TO THE PREVIEW OF ANOTHER DRAWING" width="100" height="100" border="3"/></a>
|
Same logic applies than previously. The big difference is I separated the two galleries.
You see instead of
data-lightbox="drawings"
we got
data-lightbox="another category"
What it means is the images in this category won't open if you click "next" on an image from the previous category. The slides are separated. You don't have to separate everything, it's your choice! |
|
Other art <br>
(this part is only to show how you can just put images without using the lightbox system)<br>
<img src="LINK TO YOUR IMAGE" alt="describe your image" title="title of your image" width="400" height="319">
|
You can put images directly on your page, like I showed before. This is allowed! Lightbox is just easier for bigger images, or a bigger gallery. Its also better because it doesn't open your picture in a new tab, it opens a little gallery where you can click "next" to see the next picture.
Putting images directly on your page is useful for pixel art drawings, though!
|
|
<tr>
<td>This is your cBox so people can post nice comments! (optional)<br>
<br>
<iframe src="LINK TO YOUR CBOX" width="100%" height="210" allowtransparency="yes" allow="autoplay" frameborder="0" marginheight="0" marginwidth="0" scrolling="auto"></iframe> </td>
</tr>
|
[OPTIONAL]
This part is for your cBox, if you want to have comments. You'll have to make a cBox account, and link your own cBox here. If you don't want this at all, just delete those lines of code. You can delete mean comments if needed!
|
|
|
If you try to preview your page and the lightbox doesn't work (your images just open like a normal link and not in a pop-up box), see the next page for more info on how to use the lightbox!
|

START CODING:
NEXT: the LIGHTBOX options
the ABOUT page
TIPS |
|
|